How to Treat a Sprained Ankle on a Hike
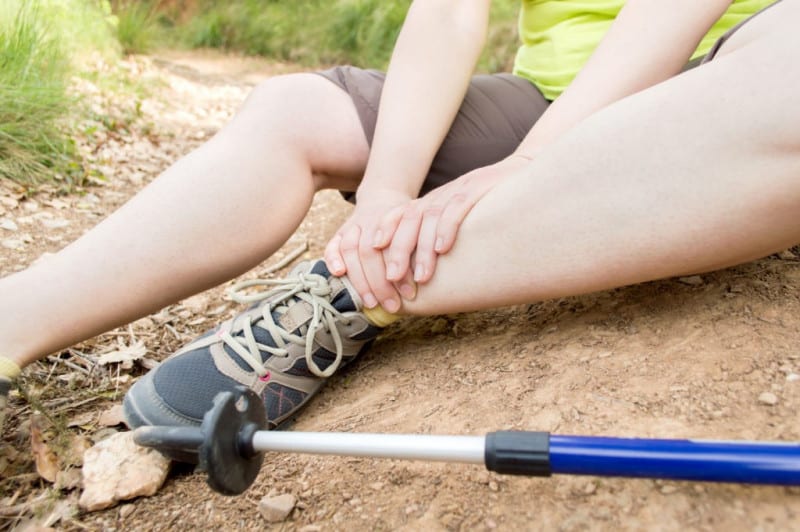
There you are, just hiking along the trail when suddenly the footing changes and you roll your ankle to one side. You feel it stretch and maybe even feel it tear. It stops you cold and it hurts. You’re pretty sure you have a sprained ankle, and you’re miles from the trailhead.
Before You Hit the Trail
Heading out into the wilderness can be an amazing experience that allows you to explore remote areas and challenge yourself. As a smart adventurer, you’ve probably already taken the steps to prepare for your journey by bringing along the 10 Essentials of Hiking (e.g. food, water, shelter, first aid kit, extra clothing) and knowing the terrain.
But anytime you’re a few hours from advanced medical care, you are assuming risk and should be prepared for injuries and illnesses. That’s why it’s good to know some first aid basics, like how to treat a sprained ankle. We recommend taking a full Wilderness First Aid course (check out the courses offered by NOLS and SOLO) for more comprehensive knowledge before you head outdoors.
What Is a Sprain?
A sprain is stretching or tearing of ligaments that attach one bone to another. Ligaments are sprained when a joint is twisted or stretched beyond its normal range of motion. Most sprains occur in the ankle and knee.
Sprained ankles are common backcountry injuries. Most of the time, the ligaments on the outside of the ankle joint are injured when the foot is rolled inward while walking or jumping on an uneven surface.
Signs & Symptoms
Symptoms of a sprained ankle include tenderness to the site, swelling, bruising, and pain with movement. Because these symptoms are also present with a fracture, it may be difficult to differentiate between the two.
RICES
First aid for a sprained ankle begins with R-I-C-E-S.
- R – Rest: Resting takes the stress of the injured joint and prevents further damage.
- I – Ice: Ice reduces swelling and eases pain. For the cold therapy to be effective, apply it as early as possible for up to 20 minutes at least 3-4 times a day. If you don’t have ice or an instant ice pack in the backcountry, think of other resources that can be used like snow or a mountain stream. Immediately follow icing with a compression wrap, as otherwise the joint will swell as soon as the ice is removed.
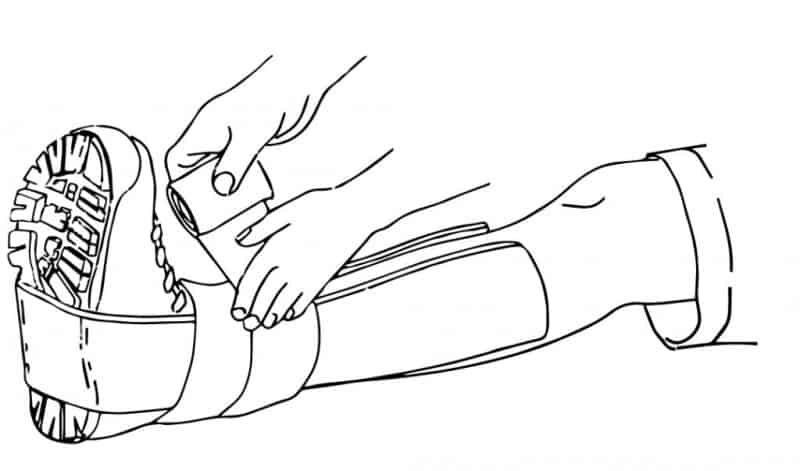
- C – Compression: Compression wraps prevent swelling and provide some support. Pad the injury with socks or other soft items, then wrap with an elastic bandage or cohesive wrap from your first aid kit. Begin the wrap at the toes and move up the foot and over the ankle with the wrap. The wrap should be comfortably tight, but should not cause numbness, tingling, or increased pain, which are signs of a too-tight wrap.
- E – Elevation: Elevate the ankle and foot above the level of the heart as much as possible to reduce swelling.
- S – Stabilization: Tape or splint the sprained ankle and foot to prevent further injury.
Continue R-I-C-E-S for at least 72 hours following the injury and administer a non-steroidal anti-inflammatory drug (NSAID) such as Ibuprofen (400-600 mg) three times per day with food to reduce pain and inflammation. As soon as possible, seek medical evaluation to determine the need for X-rays to check for a fracture.
Getting Out
For backcountry injuries, treatment has to take into account the patient’s ability to get out. If the person with the sprained ankle cannot place weight on it at all, you will need to splint the foot and ankle and get assistance out of the backcountry.
If the patient can still walk, tape the ankle or splint the ankle for support to help stabilize the joint while walking. If you have a C-Splint, you can wrap the C-Splint around the foot and ankle with the shoe in place, then secure it with tape.
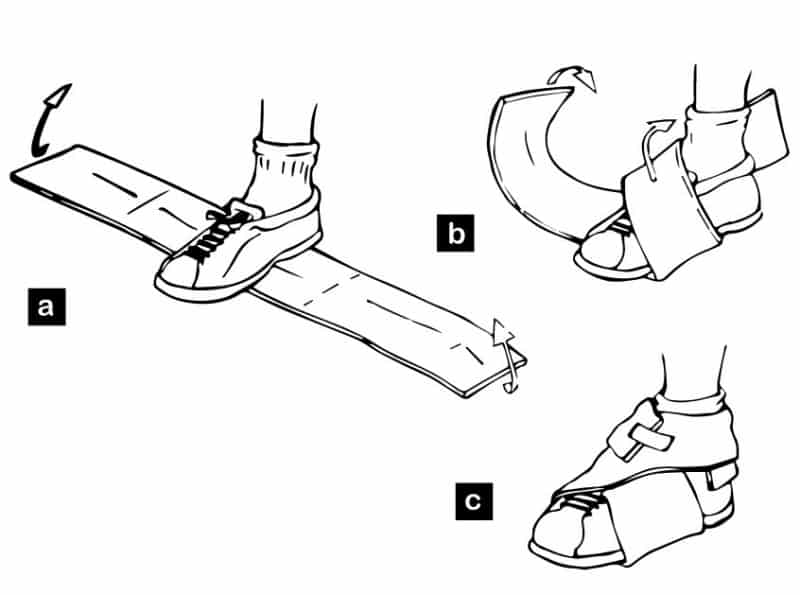
If you do not have a C-Splint, you can tape the ankle with an open-basket cross-weave stirrup pattern. Check out the end of this article for instructions on how to do this taping pattern.
With the ankle supported, begin making your way out of the backcountry, but don’t forget to practice R-I-C-E-S along the way. As soon as possible, seek medical evaluation to determine the need for X-rays to check for a fracture.
Please note: This article is not a substitute for professional medical training or treatment.