How to Use a Compass
Click here for a printer-friendly PDF
The most important piece of gear to help you find your way.
Compass Basics
A compass is one of the most basic navigation tools any hiker can own. It needs no batteries, works with any map, and even works without a map! While entire books have been written about navigating with a compass, every new compass user needs to know the basic concepts.
The first thing to realize when looking at your compass is that the floating needle is magnetized and the red end is always pointing towards magnetic north. No matter which way you turn the compass, the red needle stays fixed on magnetic north.
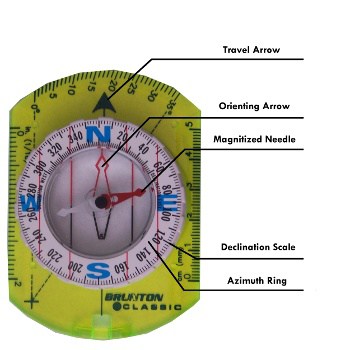 However, the second thing to know when working with a compass is that magnetic north is NOT true north (the North Pole). Since maps are oriented towards true north, you’ll find life much simpler if the N on your compass points to true north when you box your needle (have the red arrow within the red outline –the orienting arrow).
So how do we resolve the issue of these two different Norths? Declination! Declination is simply the difference in degrees between true north and magnetic north for any particular area. But be aware: the amount of difference between true and magnetic north varies by location. (Hang in there – this gets really cool!)
Now if you’re using a topographic map, it probably has a legend that displays the declination as two straight lines, where true north has a star at the top of the line and magnetic north is indicated as MN on the other line. If your map isn’t fairly new, please feel free to ignore this legend, because not only does declination vary by area – it varies over time. Just because the declination was 12 degrees west when the map was published, it doesn’t mean that it still is.
So what’s a person to do? Just type in the zip code or coordinates for the area you’ll be hiking at this NOAA website and you’ll have the exact current declination figured out for you!
Once you know the declination – it will be expressed in degrees west (a negative number) or degrees east (a positive number) – you should be able to adjust your compass appropriately. Sometimes there is a screw to adjust this, but it varies by model. If you no longer have the owner’s manual, you might be able to find directions at the compass manufacturer’s website.
For more information about magnetic declination and how to use your compass, we encourage you to view this page on the National Wildfire Coordinating Group website.
Traveling by Compass
There are two ways you can take a bearing out on the trail – by map or by sight in the field. Here is a very brief explanation of each method.
By map: place your map and compass on the ground. Then mark your current position as well as your intended destination and draw a straight line between them. Line up the edge of your compass on this line so that the travel arrow is in the direction you wish to travel, then twist the azimuth ring (which is simply the ring with the measured units of degrees on a compass) until north on the map and the orienting arrow are aligned. When you remove your compass from the map and turn until the orienting arrow and red magnetic needle are lined up, you will be in the right direction.
By sight, it’s much simpler. If you are heading to a mountain for example, point at it from your current position with the travel arrow on the compass. Then rotate your azimuth ring until the orienting arrow is lined up with the red end of the magnetic needle pointing towards north. Continue on your path so that the needle and its housing remain intact and you should have no problem reaching your destination.